Transfer photos and videos from iPhone to PC – step-by-step instructions
Step 1: Install iDevice Manager
Download the latest version of iDevice Manager directly from
software4u.de. Installation takes less than a minute.
Step 2: Connect your iPhone
Connect your iPhone to your PC using the USB cable. Your device will be recognized automatically – no manual setup required.
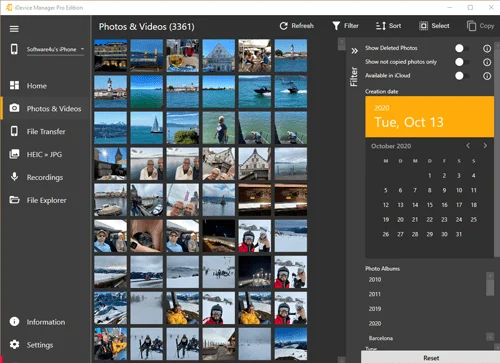
Step 3: Display photos & videos
After launching, iDevice Manager immediately displays your iPhone photos and videos – sorted by album, date, and location.
Step 4: Select files
Select individual or multiple images. Use the search and filter function to find your photos in seconds.
Step 5: Specify the destination folder
Specify where the files should be copied: to your PC, an external hard drive, or directly to the cloud (e.g., OneDrive or Dropbox).
Step 6: Activate HEIC conversion (optional)
If you have taken your photos in HEIC format, iDevice Manager automatically converts them to JPEG – compatible with all Windows applications.
Step 7: Start transfer
One click is all it takes – your photos and videos will be transferred securely. No iTunes. No cloud. No risk.
Important!
If you have activated the iCloud photo library on your iPhone, then not all
original photos are on the device. What you see in iDevice Manager are only thumbnails, just like on the iPhone itself.
It is not possible to transfer iPhone photos that are in iCloud.
You must disable the iCloud photo library on your iPhone.